
While working with QuickBooks Desktop software, did you encounter Error Code 15263 and cannot fix the same? Feel relaxed, as our experts have encapsulated the most effective methods for rectifying Error Code 15263 in QuickBooks.
When a user attempts to download the most recent Payroll update, QuickBooks error code 15263 may show up. The erroneous setting of Internet Explorer is a common conspicuous cause behind this error code. There are various avenues for uprooting this snag.
You can attempt to use the QuickBooks Tool Hub if you want to get rid of this error. However, there are several other troubleshooting methods as well. For an in-depth understanding, go through this entire article till the very end.
What incites Error Code 15263 in QuickBooks?
Several factors may contribute to the QuickBooks error code 15263. These include:
- Corrupted or damaged device drivers installed on the P.C.
- If QuickBooks or the Windows operating system are not updated.
- Download the most recent updates from a dubious website link.
- Using a web browser with incorrect settings, particularly when using Internet Explorer.
- Inconsistent firewall and antivirus settings.
Effective Methods to Rectify the QuickBooks Error Code 15263
Let’s hover over the many ways to fix Error Code 15263 in QuickBooks Desktop.
Method 1: Update Windows & QuickBooks Desktop
- Hit on the Windows button and type ‘QuickBooks’ into the search field.
- Hit on ‘Run as Administrator’ after right-clicking on the QuickBooks icon.
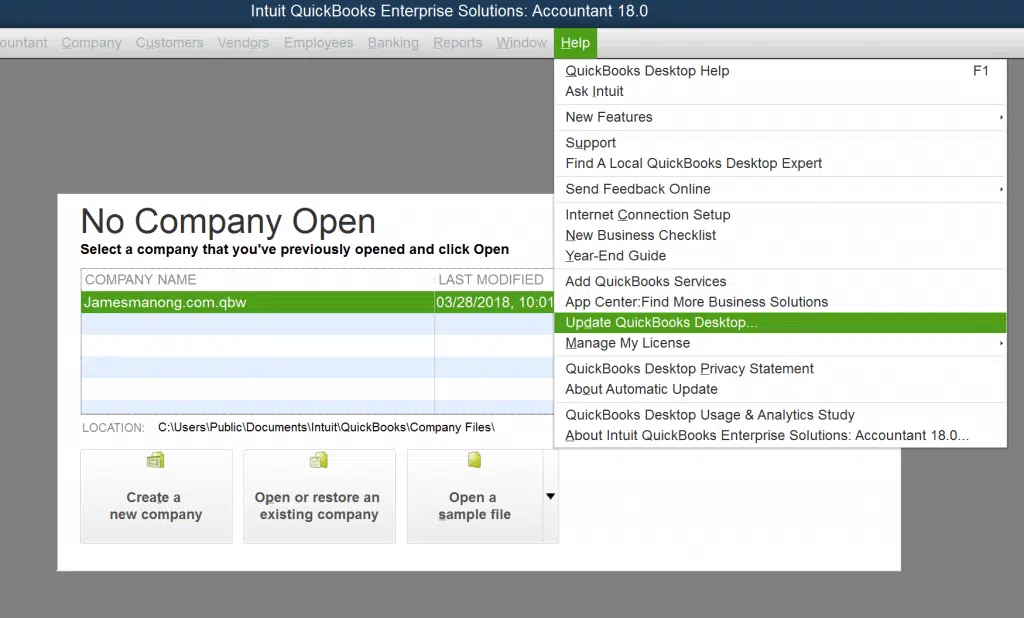
- The ‘No Company Open’ window shows up. Choose the ‘Update QuickBooks Desktop‘ option under the ‘Help’ tab.
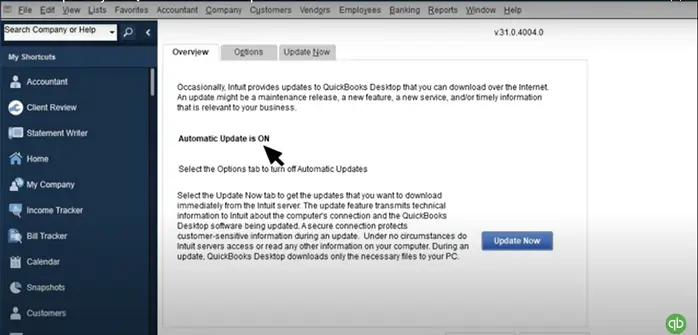
- Hit on ‘Mark All’ under ‘Options.’
- Afterward, hit on ‘Save,’ then follow it up by choosing ‘Update Now.’
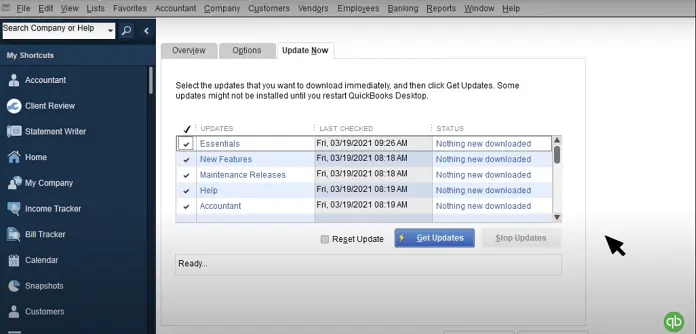
- Subsequently, hit on the ‘Reset Update’ option.
- Afterward, hit on ‘Get Updates’ to access the available updates and install them.
- Hit on the Windows icon and choose the ‘Security’ option. Subsequently, update Windows.
- Choose ‘Windows Update’ under the ‘Update & Security’ option.
- Hit on the ‘Check for Updates’ option. Show patience while the system searches for the most recent update.
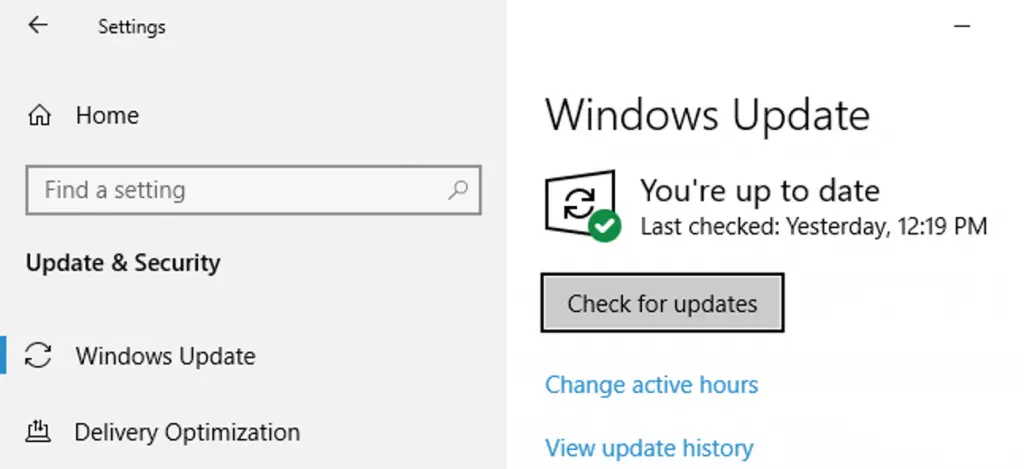
- Once the updates get installed, hit on the ‘Update Now.’
Method 2: Reconfigure the Advanced Settings in the, I.E., browser
- Exit the QuickBooks Desktop software, including the current company file that you are working on.
- Launch Internet Explorer.
- Afterward, choose ‘Tool,’ followed by hitting the ‘Internet Options.’
- Choose the ‘Make Default’ option under ‘Programs.’
- Hit on the ‘OK’ button.
- Proceed ahead to the ‘Advanced’ option.
- Subsequently, hit on the ‘Restore Advanced Settings.’
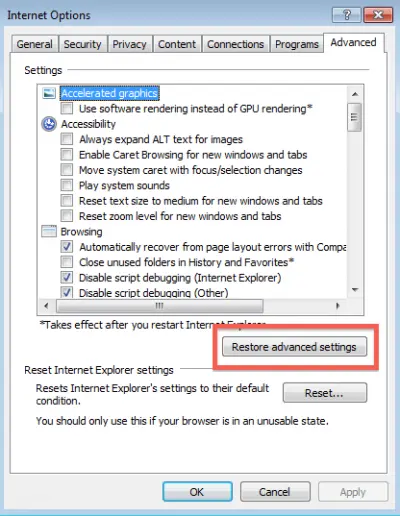
- Click ‘OK,’ and then hit on ‘Done.’
- After that, hit ‘Settings’ and then navigate to the ‘Security’ section.
- Hit on ‘Use TLS 1.2‘ and uncheck the ‘Do not save encrypted pages’ option.
- Afterward, hit on ‘OK’ and click on the ‘Done’ tab.
- Choose the ‘Delete’ button, followed by hitting the ‘Temporary Internet data files’ in the ‘General’ tab.
- Hit on ‘Delete’ once more.
- You now need to proceed to the ‘LAN Settings’ option and then the ‘LAN setup’ option in the ‘Final Connections’ box.
- There, you need to uncheck ‘Proxy servers’ and check the ‘Automatically Detect Settings’ option.
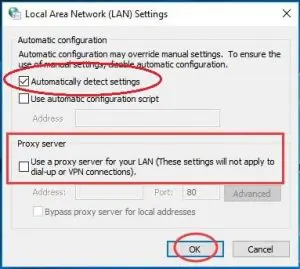
- Hit on ‘OK.’
- Additionally, choose ‘SSL 2.0’ and ‘SSL 3.0.’
- Uncheck ‘Check for publisher’s certification‘, then apply your changes and press ‘OK.’
- Close the window and get the latest QuickBooks updates.
Method 3: Include QuickBooks Desktop in the Firewall’s Exception List
- Type in ‘Firewall’ in the search box of the Windows ‘Start’ menu.
- Double-click the ‘Windows Firewall.’
- Head to ‘Advanced Settings’ and afterward, opt for the ‘Inbound Rules.’
- Right-click to choose a ‘New Rule.’ To build Outbound Rules as well, you must repeat these procedures.
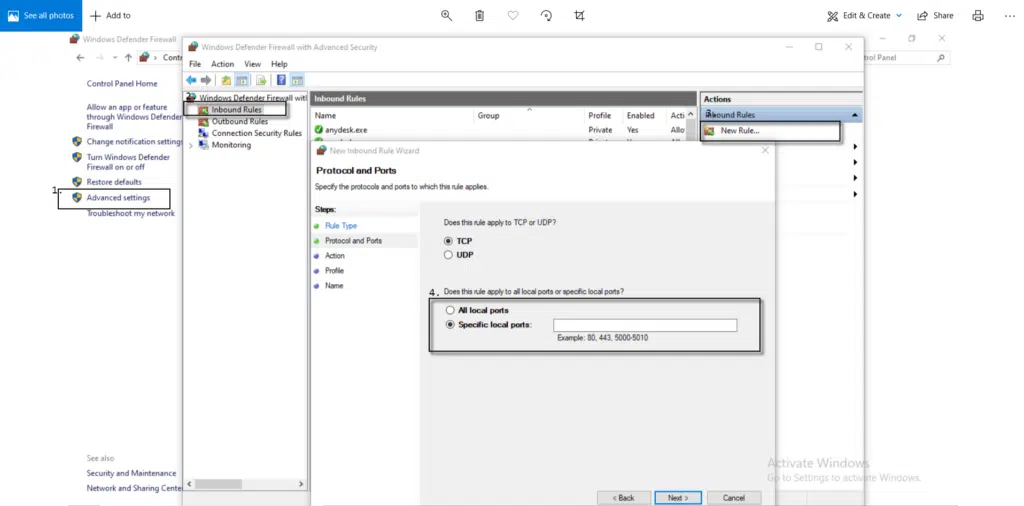
- Choose ‘Program,’ followed by hitting on ‘Browse.’
- Choose ‘This Program Path,’ followed by hitting on ‘Next.’
- A list of QuickBooks executable files will appear. Choose one of them, and then make comparable rules for all the other files.
- Review all the profiles after hitting on ‘Allow the Connection,’ followed by pressing ‘Next.’
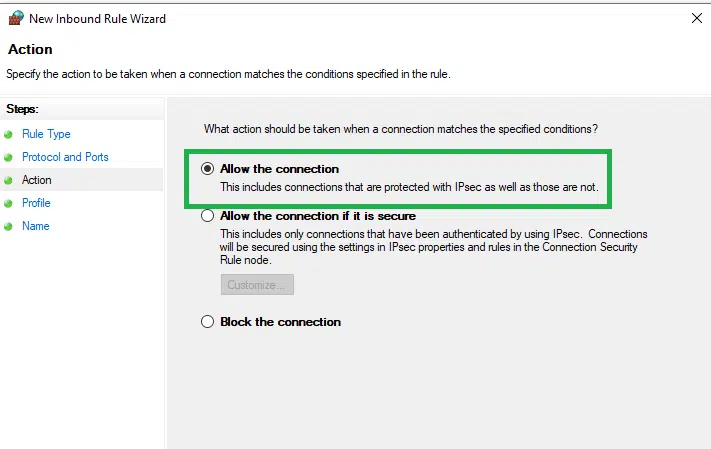
- Hit a click on ‘Next’ and give the rule some name, such as ‘QBFirewallException’ (name.exe).
Method 4: Check the Correct Date & Time Settings
- Proceed to your home screen after closing the QuickBooks Desktop window.
- Hover over the bottom-right corner of your taskbar’s ‘Date and Time’ region.
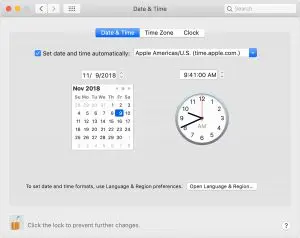
- Verify that it reflects the right Date and Time. Erroneous settings can interfere with the seamless functioning of the QuickBooks software.
- To change the date or time, right-click the section and choose the ‘Adjust date/time’ option.
- Now, adjust the settings precisely to reflect the time zone in which you are presently working.
- Reopen the QuickBooks Desktop software after saving the changes.
Read Also: Easy Steps to Solve QuickBooks Error 1926
Method 5: Check Cipher length
- Access, I.E., browser
- Subsequently, head to the intuit official website
- Hit on the alt key, followed by properties
- Head to the connection tab and find the cipher number
- In case the cipher length is less than 128 bits, it reflects that the, I.E. browser is not with 128-bit encryption.
- In such a case, QuickBooks may not work and might show error code 15263.
We hope that the contents of this article went a long way toward resolving QuickBooks Error Code 15263. Just in case you face any difficulty while performing the methods, make sure to give our QuickBooks payroll error support experts a call. You can also reach out to our technical team via 1-800-615-2347 or the Live chat option accessible from our website.